Wednesday, August 1, 2012

Saving Scallion Seeds

We were harvesting scallions all spring after they survived the mild winter. 

I kept them around until they formed seed pods, and when the flowers looked mature enough that I could see the little black seeds


I lopped off their heads.

They've been sitting in a paper bag on top of our refrigerator, drying out for several weeks.  After giving the bag a good shake, I could hear that lots of seeds had come loose.

And, now we're going to plant them, to harvest in the fall, and maybe through the winter and spring, if we're lucky.

I use scallions all the time and have hated to buy them at the store the last couple of months.  Now I realize that I should have planted more first thing in the spring to harvest throughout the summer.  And if we continue to let some go to seed, we'll never have to buy scallions, or scallion seeds again.  The best part is that insects and animals want nothing to do with them, and they don't need any fertilizing or pruning.  They just grow. Easy stuff!

Monday, July 30, 2012

The Garlic Harvest

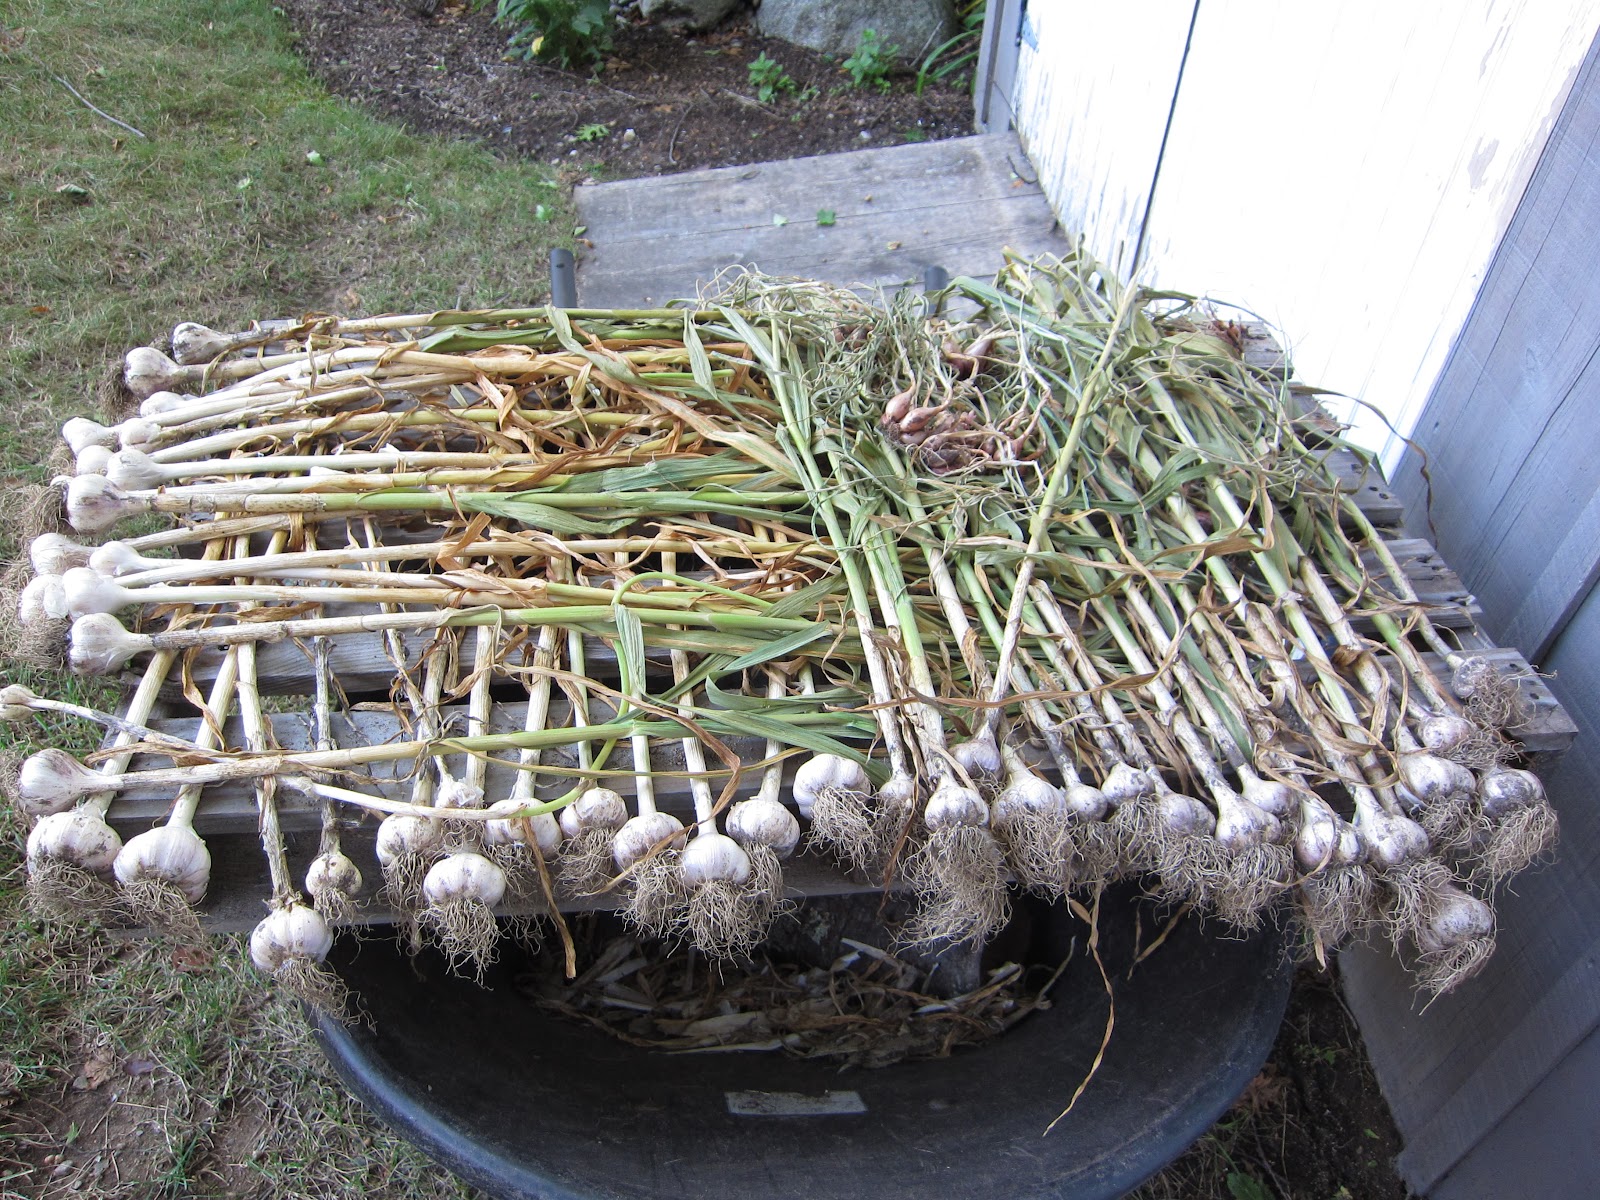
Half of our garlic looked like it should have been harvested weeks ago, but we finally got around to it last weekend, when it all looked ready.  You're supposed to harvest when the two bottom leaves start to look brown.  These were screaming to be pulled out of the ground.
Side note: When we harvested the garlic scapes, it looks like we missed one.  They're supposed to keep the bulbs from growing bigger, and this one (on the left, if it's not obvious) was in fact small compared to the best looking bulbs.  But there were a few other small ones, too, so it might have been doomed from the start for other undetermined reasons.
We planted three varietes last fall- German Extra Hardy, Persian Star, and Russian Red, but I can't tell which is which now.  Maybe next time we'll label them.

I read somewhere that someone (I can't find what I read now, of course) harvested garlic a few weeks ago and had the biggest bulbs ever after fertilizing them when they sprouted for the first time this year.  Some people say it's not necessary, but I think it'll be worth trying next year. 

The Vegetable Gardner's Bible says to remove the outer two leaves and cure the garlic in full sun for two to three weeks, but most other instructions say bright shade, where there's plenty of air circulation.  We've got ours on a pallet on a wheelbarrow so we can move it around, and we roll it into the shed when it's going to rain. 
A few weeks like this and then we'll trim them and store them in the basement (the coolest place we've got) in a mesh bag.  The hope is that, if properly cured, they will last for many months. Once they sprout, they start to loose their eating quality. 

Of course, we don't have to wait for the garlic to cure to enjoy it.  I've been using the smaller bulbs since we ran out of store-bought garlic last week.  Last night, we had shrimp scampi with fresh garlic and parsley from the garden.

Monday, June 25, 2012

Scrambled Eggs with Pancetta and Garlic Scapes

I love making a morning trip to the garden to snip something for breakfast.  This weekend we incorporated some garlic scapes into a usual Sunday meal at our house. 

Trader Joe's sells these 4-ounce packages of diced pancetta that are so convenient.  I often use them in soup or pasta dishes, but recently we realized that it's an easy way to add bacon to our breakfast without the mess.  We usually make this with scallions and red pepper, or whatever vegetables happen to be in the fridge, but garlic scapes made these eggs extra special.

Scrambled Eggs with Pancetta and Garlic Scapes
(serves 2)

4 eggs
salt and pepper
2 garlic scapes
one 4-ounce package of diced pancetta

The scapes get diced like so

and then sauteed in olive oil for a couple of minutes (just long enough to split the English muffins and put them in the toaster oven).

Add the eggs (already beaten and seasoned with salt and pepper),

and stir until cooked.

This is the time of year you'll find scapes at your local farmer's market, if you're not growing garlic at home.  With over 40 garlic plants in the garden, we'll use these a few more ways before we're done.  I think we've found that they are best in the simplest recipes, so you don't lose the subtle flavor.  Have you tried garlic scapes?  How do you like them?


Wednesday, June 20, 2012

Garden Update

I never photographed the tomato seedlings before they went in the ground Memorial Day weekend. You'll have to trust me when I tell you that they grew big and strong.  We had 24 plants, three varieties- a friend's heirloom, Black Cherry, and Brandywine- and we found homes (read: forced them on family members) for all but six.  We planted two of each variety, plus 7 more- Brandywine Sudduth, Big Boy, Gold Medal, Cherokee Purple, Green Zebra, Rosso Siciliano, and Mexican Midget.

They haven't been growing too fast because it's been rainy and cool, but here's one we grew from seed that's doing pretty well.  We're supposed to have a heat wave this week, so I expect they'll be doing a lot more growing soon.

See the new bed Matt dug for us? 

It's closer to the house and in a spot that gets full sun.  That's the "upper garden," and we're still utilizing the "lower garden," where the garlic and peas are nearing harvest time.

That's the garlic patch, and we picked some scapes for dinner.

The scapes need to be removed or the garlic bulbs won't grow as big.  They're good sauteed with olive oil and tossed with spaghetti.  The garlic will stay in the ground for about another month.

The peas (snow peas and a variety of English peas called Sutton's Harbinger), planted mid-April, have been flowering and developing pods for a few days now, right on schedule.  I expect we'll start picking some by the end of the week. 

This is our first year growing peas, and I'm actually amazed that it worked.  I haven't done much at all to them since we put the seeds in the ground, and here they are.  I shouldn't count my chickens before they hatch, I suppose.  They will not benefit from the heat wave as much as the tomatoes, but they do get some shade, and we'll keep them well watered.  Fingers crossed!

Monday, June 18, 2012

Bathroom Progress

I'm back!  I wouldn't blame anyone for assuming I'd given up this whole blogging thing, but I like it too much to do that.  It was a just a  temporary haitus- a few days turned into weeks, many weeks, and here we are, let it be noted, before it turned into months.  Things haven't stopped happening around here, so I'll try to fill you in as best I can.

The bathroom is coming along nicely.  The last update was just after the drywall had been put in. 

Then, Matt and his dad installed the shower and ceiling boards. 

We purchased a Schluter-Kerdi shower kit, and they followed the directions. I stayed out of the way, so my version of what happened goes a little like this: There's a shower pan and then a curb, and then everything has to be sealed with the orange Kerdi membrane.  It took them a couple of days to complete, and I didn't get the sense that it was their favorite part of the project so far. 

We used 1x8 tongue-and-groove pine on the ceiling, stained with Old Master's Pickling White. 


I had wanted them to be whiter, truth be told, but this is what we've got for now.  Initially I bought a wiping stain, and then I discovered the penetrating stain when I went to a different store to pick up a second quart.  Penetrating stain, well, penetrates, therefore you get a deeper color.  Each board got a coat of each, but they would have been whiter if we had used penetrating stain from the start.  Then they were sealed with two coats of matte polyurethane. 

The most significant development was the addition of tile.  This is when the bathroom really starts to look like a bathroom. 

We hired a couple of guys to do this, and it was worth every penny.  They worked for three days, while I made decisions about things I hadn't anticipated, like what color grout we wanted.  I was not aware that there were any choices, let alone so many.  So, here's what we've got:

3" hexagonal carrara marble on the shower floor, with silvertone sanded grout

Grazzio glass subway tiles in matte ice mist, with standard white grout

Serenissima Woodland tiles in Rovere on the bathroom floor, with sandstone beige grout


Yes, we went with tiles that look like wood.  I was amazed with the options, and could have written a whole blog post about them, if I had been on the ball at the time.  These looked rustic to us, and we liked them immediately.  It easily solved the problem that I was unwilling to compromise on wood, but that you can't lay real wood on top of a heat mat.  (And there was that concern that other people had about wood not holding up in a bathroom.)

After the tile was done, Matt and his dad installed the beadboard, and the plumber hooked up the shower fixtures, and the toilet.  The selection of beadboard could have been yet another blog post.  We wound up choosing 1x6 tongue-and-groove beadboard.  We liked that it was slightly wider and much more sturdy looking than the (of course) less expensive options. 

Now we don't have to go downstairs in the middle of the night.  But there's no sink yet, so we can't wash our hands.  Don't tell anyone. 

Ta da!  That is the bathroom so far.  Next up: the ceiling trim and the linen closet.  We have to wait another week for the shower door to arrive.  Matt's dad is working on building us a vanity this week.  And, I'm still on the hunt for a remnant piece of marble for the countertop.  Stay tuned for more soon.

Wednesday, May 9, 2012

The Tomato Plants' First Leaves


This is a bittersweet moment.  My babies are growing up.  But, because I planted two (and in a few accidental cases, three) seeds per cell, I am now forced to choose the strongest seedlings. I used a nail scissors to snip off the losers at the base. 

The moment I was waiting for was when the true leaves formed.  See the krinkly ones?

Those are the true leaves.  The others are the cotyledon, which will fall off as more true leaves develop.

It is also time feed them, an organic fish emulsion and seaweed fertilizer, at half strength.  I just mixed a tiny bit with some water and poured it over the plants, careful not to flood them.  I read that with organic fertilizers there's little risk of doing too much, but other fertilizers could burn the little guys if you overdo it. 

Otherwise, they'll continue to grow as they have, with 16 hours of light and a continuous supply of water, that I check and refill about every 5 days. 

Oops- I almost forgot.  Now I also add the fan for a few hours a day.  This makes them stronger.  Tough love.

So far, this growing-tomatoes-from-seed thing is pretty darn easy, once I got over the intimidation and equipment set-up.  That certainly doesn't mean I'll be successful, but at least the frustration level is still at zero.

Friday, April 27, 2012

Tomato Seedlings and a DIY Grow Light

Now I've done it.  My little tomato seeds have all sprouted, so I am committed to caring for them for the next several weeks until they're ready to go out into the world our back yard. 

As recommended, I put two seeds in each cell, and almost all of them came up.  When the first true leaves form, I'll use a nail scissors to cut away the weaker of the two.

I made a trip to Lowe's last weekend and came home with a small  (25") shop light and two flourescent bulbs. 

I thought we would just mount it onto something and rest the tray of seedlings underneath, but it turned out to be more of a DIY project than I bargained for.  Maybe I am naive, but I assumed the light I bought would come with a plug.  It turns out that this thing had to be wired in, and it did not come with any instructions.  But Matt made us both proud.  He cut the end off an extension cord and stripped the wire casing back, and attached the appropriate wire ends to the right places.  VoilĂ - a shop light with a plug. 


You'll note that this shelving unit (an old wine display from a store that we picked up on the street on trash day) could accomodate another light and tray of seedlings, should I be successful at this endeavor and want to do even more next year. 

The self-watering tray has been great.  I haven't had to fill it up since I started the seeds a week ago. I check the level once a day by sticking my finger in the side, and then also touching the capillary mat to make sure it is still damp.  I've got the seedlings propped up on boards so that they are about 2 inches away from the light, and I'll remove boards as they grow.  The lights are on a timer for 14 hours a day. 

When it comes time to trim away the second seedlings, I'll also fertilize them. And, the last thing I'll do is add a fan, on low, per the grow-better-tomatoes-from-seed instructions on AWaytoGarden.com.  The slight wind makes them stronger. 

I'm looking forward to doing some outdoor planting this weekend, but I'm sorry to say that it's also time to wash windows again.  Do you have anything good planned?  I hope you have a great weekend!