Friday, May 13, 2011

Getting Ready to Plant

I stopped by the garden center last night to pick up our vegetables. Tomorrow is planting day.
It's exciting, and hard to imagine that these little plants are soon going to take over our 10 x 17 plot.  The garlic and shallots are already doing their thing.  Some carrots and beets and arugula have begun to sprout.  I'm not sure what happened to the spinach, but there's no sign of it yet. 

Ed (in the Vegetable Gardener Bible) suggests buying plants in 4 inch pots that aren’t too big and don’t have lots of roots growing out of the bottom, as that’s an indication that the plant is already stressed. I got a “fancy” eggplant, a Sweet 1000 cherry tomato, a Brandywine Heirloom tomato, some leeks, 2 parsley, 2 basil, and a dill. I really wanted to try Sweet Banana peppers, but they only had those in the smaller 6 packs, so I bought them anyway. Ed and the little, old Italian woman also shopping at the garden center said that peppers "like to hold hands," so we’ll plant two and I’ll try to find a home for the other four.

On a whim, I also bought some more seeds, because I think we’re going to have more room than I expected, and I can’t seem to control myself. We’ll be adding edamame and cilantro to the mix now, and I also got some parsnips and kale to plant later in the season when some of the early plants are done.

I also left the garden center with this stuff:
The black mold on our holly is basically excrement left behind by aphids (gross), so we have to douse the top and bottom of each leaf with the oil spray on three different occasions in attempt to evict them. Then we have to pour the systemic stuff around the roots every spring and fall until the end of time to keep them away. If you think that sounds like a lot of work, I agree.

And it was all I could do to not to buy some beautiful shade-tolerating plants that I'd never seen before- a pink and yellow columbine, a white columbine and a yellow globe flower (all from White Flower Farm). 
Aquilegia Swan Pink and Yellow

Aquilegia Dove

Trollius x cultorum Cheddar

Yes, please.  Another time, I hope.  I know just the spot I'd put them.

P.S. I linked up to Remodelaholic to show off my teak chairs.  Check out the other projects here.


Thursday, May 12, 2011

Early Rhododendrons


These are the first blooming rhododendrons I've seen this year, and they're in our yard (which I'll admit makes them more noticeable to me).  These are always early, but our others tend to bloom on the very late side to balance things out.

They're not much to look at, at the moment.  The late bloomers have been on an every-other-year schedule for spectacularness, and, if they keep it up, this year should be spectacular.  On the off years, they bloom, but the blooms are much fewer. 

We bought a couple of new rhododendrons a year and a half ago, at a fall sale.  We were told they were fast growers, and we were hoping to create more of a barrier between our yard and our neighbors.  They actually looked worse last spring, and last summer we dug them up, soaked the roots, replanted them, and they did a little better. 
I don't have much hope for these guys.  Still, I'll ask at the garden center if they have any ideas.  Or I'll just be patient and hope. 

I do need to seek out some advice about a couple of our holly trees that seemed to have developed a black mold.
Sad. It seems like everything needs a little attention at the moment.   At least we have this:

Tuesday, May 10, 2011

Mini Bathroom Makeover

One of the first projects I tackled when we moved in was to strip this wallpaper and paint our downstairs bathroom.
I thought I could do the job myself in one long weekend, making it the first time I made the mistake of thinking that I was good at estimating how long a project would take.  Three weekends later, it was done, but not to either of our satisfaction.  There was a reason that wallpaper was covering up those walls.  They are bumpy and cracked and should have been repaired before they were painted.  We have added it to our list of projects we'll get to "someday."

In December (six months ago now), I set out on another small project- to replace the faucet and light fixture.  You can pick out the *nice* brass faucet in the old photo, but what you can't see is that the metal is peeling.  I didn't even know that was possible.  So, I ordered a faucet online, and a light fixture to match. 

(This was the old light fixture, which I thought about spray painting oil-rubbed bronze, but I still wanted an updated shape, and shades, so I decided against it.)

Each time we attempted to tackle this project, it grew, mostly due to my unfortunate lack of plumbing knowledge.  The first attempt, we learned that we needed a "rough-in valve" to go with the "trim kit" (faucet) I bought.  It turns out that the plumbing underneath every sink is unique to the faucet above.  Who knew?  I didn't.  So, we went to the plumbing supply store, showed them the faucet and they gave us a rough-in valve. 
 
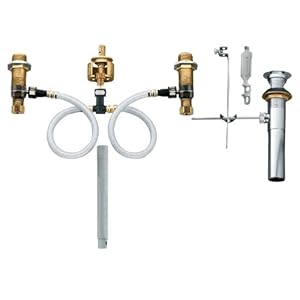
But the valve didn't fit.  It went together with our faucet (the plumbing supply people know what they're doing), but I had ordered the wrong faucet.  Our sink was set up for an 8" faucet, and I had bought a 4".  I did mean to buy the 8" (I can measure), but I didn't order right.  I'm usually good at buying things- I honestly don't know what happened. We definitely needed an 8" rough-in valve to match the holes in the sink, but we thought maybe the actual faucet wouldn't matter if the handles and spout are not attached to each other.

Moen CAT6125ORB Bathroom Sink Faucets - 8" Widespread Faucets
8 inch

4 inch
They look the same, right? We ignorantly proceeded, assuming we could use the 4" faucet with an 8" rough-in valve.  I exchanged the rough-in valve for the 8" to fit the sink. 

Sometime in February, we removed the old faucet to find that it left big rings on the porcelain that would not be covered up by the new faucet, so we decided to get a new sink.  And, if we were getting a new sink, we were going to get a new countertop, because ours was wood and splitting anyway.  I ordered a sink online, and brought it to a marble fabricator, where I picked out a piece of crema marfil.  I told him we wanted holes for an 8" faucet, and I showed it to him.  He said, That's a 4" faucet, and I said, We got an 8" rough in valve, and are using the 4" faucet with that.  He said, Yeah, you can do that, giving strength to my ignorant ideas. 

It turns out that a 4" faucet does not fit on an 8" rough-in valve, and we had to order another faucet. It's too late to return the 8" faucet, of course, as it's been 6 months and the product was discontinued. If only we had figured this out before the marble was cut we could have asked for 4" holes.

Alas, it all fits together and here is the finished work:


In summary, I share my story to pass along the lessons I learned so you don't have to:
Faucet parts aren't interchangeable, but they are all sold separately.
Marble fabricators are not plumbers.
Weekend projects take 1-6 months.

Monday, May 9, 2011

Mother's Day Brunch

I grew to love brunch in college, when a bunch of us would cram into a long booth, order lots of food, and tell stories about what happened the night before.  Now, it's the leisurely pace of it, and the choices. Do I want sweet- blueberry pancakes- or salty- an omelet?  (Hash browns and English muffins usually win me over to the salty side.)

It makes sense that lots of people celebrate the woman who brought them into this world with brunch, because we get to take the time to enjoy each other's company over a leisurely Sunday meal, and- Really. Appreciate. Life.

I prepared this easy Baked French Toast the night before, with Portuguese sweet bread (it was the closest thing they had to Challah) instead of Italian bread, and some vanilla, cinnamon, and orange zest in the egg mixture, and served it with strawberries and maple syrup.  I made this fritatta with spinach instead of arugula because they didn't have any at the store. I doubled the garlic and kept it in (the recipe says to take it out- why??), and added a little crushed red pepper.  We also had plenty of bacon, and bloody marys.

For dessert, I turned this Barefoot Contessa recipe UPSIDE DOWN by using dark brown sugar instead of light because I didn't have any, and raspberries instead of blueberries. 

Raspberry Crumb Cake
adapted from The Barefoot Contessa at Home

For the streusel: 
1/4 cup granulated sugar
1/3 cup dark brown sugar, lightly packed
1 teaspoon ground cinnamon

1/8 teaspoon ground nutmeg
1 stick unsalted butter, melted
1 1/3 cups all-purpose flour

For the cake:
6 tablespoons unsalted butter, at room temperature
3/4 cup granulated sugar
2 extra-large eggs, at room temperature
1 teaspoon pure vanilla extract

1/2 teaspoon grated lemon zest
2/3 cup sour cream
1 1/4 cups all-purpose flour
1 teaspoon baking powder
1/4 teaspoon baking soda
1/2 teaspoon kosher salt
1 pint fresh raspberries

Confectioners' sugar for sprinkling

Preheat the oven to 350 degrees F. Butter and flour a 9-inch round baking pan.

For the streusel, combine the granulated sugar, brown sugar, cinnamon, and nutmeg in a bowl. Stir in the melted butter and then the flour. Mix well and set aside.

Cream the butter and sugar in the bowl of an electric mixer fitted with the paddle attachment on high speed for 4 to 5 minutes, until light. Reduce the speed to low and add the eggs 1 at a time, then add the vanilla, lemon zest, and sour cream. In a separate bowl, sift together the flour, baking powder, baking soda, and salt. With the mixer on low speed, add the flour mixture to the batter until just combined. Fold in the raspberries and stir with a spatula to be sure the batter is completely mixed.

Spoon the batter into the prepared pan and spread it out. Crumble the topping evenly over the batter. Bake for 40 to 50 minutes, until a cake tester comes out clean. Cool completely and serve sprinkled with confectioners' sugar.


Mine was perfectly cooked with the full 50 minutes.  It was all you would want in a coffee cake and more.  I will double the raspberries next time.  The little morsels were delicious when found, but more of them would be even better.

We spent the later part of the day visiting with my in-laws, who had plants that needed splitting.  We happily obliged, and brought home a bunch of irises, some bee balm, and a hibiscus. 

I hope you all had a leisurely and happy Mother's Day.

Friday, May 6, 2011

Fridge Magnets

It all started with this bumper sticker that came in the mail with my order from Penzey's (which is a great source for good spices if you don't know about it already).
I liked the sentiment, and the subtle colors, and I stuck it up on the fridge.  But then there were magnets holding the bumper sticker, and there was a wrinkle where the part on the back sits that you're supposed to pull away when you stick it somewhere.  So, I decided to turn the bumper sticker into a magnet.
I bought these adhesive magnet sheets, put them together, and I had a magnet. 
It took about 20 seconds.  But then that got me thinking:  What else can I turn into a magnet?  When we first bought this refrigerator, I had promised that I'd find a way to camoflauge the unfortunate black side of the stainless steel appliance.  I had thought I'd do something with moulding or a lightweight frame and fabric, like this:
DIY memo board
Thifty Decor Chick
She attached her fabric and frame to a zinc sheet so she could hang it in her office, but the side of my fridge is already magnetic, so I'm half-way there.  Except, I worry about how the fabric would hold up.  So, what else could I make into a magnet?
I took some of the beach rocks that were in the boot tray and used Gorilla Glue to attach them to some heavy duty magnets.
Those are kind of neat.  Do I make a lot of them and cover the whole side of the fridge?  That seems kind of silly.  What else do I have on hand that I could turn into a magnet?  What do I have lots and lots of?  (Oh, no, she didn't.)  Corks!

I kind of like it.  I bought some balsa wood at A.C. Moore, and used an x-acto knife to cut it into pieces the size of the magnetic strips I used for the bumper sticker.  I used Gorilla Glue to stick them together (because it was what i had; you could probably use any craft glue), and then wood glue to attach the corks.  It took about 10 minutes.
(You can barely see the balsa wood there. Sorry.) So, now I'm not sure what direction to go in.  Do I cover the whole side of the refridgerator in these cork magnets?  Half corks, half rocks? Is that too much cork for one kitchen, considering these...


What do you think? 

Thursday, May 5, 2011

Saucer Magnolia

I love these trees.  Every year I admire them blooming in other people's yards.


By process of elimination I've determined, I think, that it's Saucer magnolia (Magnolia × soulangeana). 

I saw some Jane magnolias (or, liliflora ‘Nigra’ x M. stellata ‘Rosea’) at the garden center.  The flowers seem a little darker.  I think this is a Jane.


Also pretty, but my heart lies with the Saucer.  I've even picked out the spot where I would put it in our yard.
Right in the middle there.  (Please excuse the dandelions.) Isn't that spot just crying out for a beautiful tree?  Our neighbor had said he was going to build a retaining wall between our property and his, so we've been holding out on doing anything with this space until then.  But, maybe if I planted a small tree in far enough from the property line, I wouldn't have to wait.

While I was out in the yard scoping out this spot, I also captured some tulips that just popped up in front.


Pretty, huh?  The funny thing is, they've never been there before, and we have no idea where they came from.  They're welcome to stay, of course.

Wednesday, May 4, 2011

Quick Dinner, Favorite Gadget

I'm always in need of inspiration for quick weeknight dinners.  I know I'm not alone.  Last night we went back to an old favorite we hadn't had in a while, and I thought I would share it with you.

This is an adapted version of this recipe from Epicurious.  It calls for cabbage, which doesn't do much for me, and snow peas, but the cooking, trimming, chopping always took too much time, so now we skip them, or throw in some red pepper instead.  I love that I usually have most of these ingredients on hand, and just need to pick up a rotisserie chicken, and maybe scallions and cilantro on the way home from work.  (I should note that I forgot the scallions this time around, and we did without, but it's even better with them.)  I also love that there's no actual cooking involved, so less clean up.

Chinese Chicken Salad
serves 4

1/4 cup soy sauce
1/4 cup lemon juice
2 Tablespoons sugar
1 Tablespoon white vinegar
1 teaspoon salt
1/2 teaspoon fresh ground pepper
1 Tablespoon sesame oil
1/4 cup olive oil

1 rotisserie chicken, breast skinned and shredded with a fork
1 bag of romaine lettuce
1/2 cup chopped scallions
1/2 cup chopped cilantro
1/2 cup sliced almonds, toasted
2 Tablespoons sesame seeds, toasted

Whisk together soy sauce, lemon juice, sugar, vinegar, salt and pepper in a small bowl, then add sesame oil and olive oil in a slow stream, whisking until well combined.  Toss chicken, scallions, cilantro, almonds, and sesame seeds (and, in this case, red pepper) with half the dressing. 

Side bar: I used to avoid recipes that called for chopping fresh herbs because it slows things down when you're in a hurry, but now I have a favorite tool that makes it super easy- the OXO Herb Mincer.  There are four blades and it only takes a few rolls in each direction to go from this:
 to this:
You should get one. 

Drizzle remaining dressing over the romaine, then mix in the chicken. 
Dinner is served.  (I'll work on taking prettier pictures.  It was delicious, despite how it might look.)