Friday, December 30, 2011

2011 Accomplishments

I've been reading through several other bloggers' top 10 lists this morning, and am inspired to take a look back at what we have accomplished around here in 2011.  Sort of a public, pat-myself-on-the-back, if you will allow it.  It's easy to get lost in the to-dos and forget to enjoy the dones.

We had our major projects...

The Green Bedroom Makeover involved some fresh paint, tearing up stained carpet, and having hardwood floors installed.

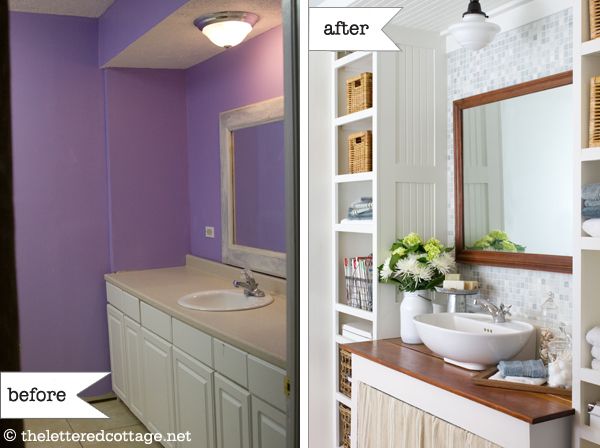
This Mini Bathroom Makeover was more of a chore than it should have been, but it was a learning experience, and all's well that ends well.

Digging the Expanded Vegetable Garden was a lot of work for someone else in this house, but I put in a lot of time planning and planting (and learning how to do better next year?).

The Yellow Bedroom Makeover was the most dramatic change of 2011, knocking down a wall, ripping up carpet, getting a new floor, and painting.

Staining the Porch was the project that spanned the summer, since staining and rain don't mix, and it rained all summer (and when it didn't, we wanted to enjoy being outside).  But it's done.

These were more purchases than projects, but they are home improvements that still make me happy every time I look at them...

The Sideboard we snagged for $75 on Craigslist.

And the new range and microwave I'm still learning how to use. 

And, I have a few favorites in the small project category...

My first peonies, because patience is eventually rewarded.

The Beacon Hill Table, because it was such a pleasant surprise, and I admire it every day.

And The Ottoman Tray, because it demonstrates so well that apparent trash really can be treasured, and that sometimes what you're looking for is right under your nose.

Of course, starting this blog was one of my greatest personal accomplishments of 2011, allowing me to stop writing make believe blog posts in my head, and actually send real information out into the blogosphere that a few people might actually read.  So, thank you for making that possible!

I'll be back in the early days of 2012 with some forward looking plans, and, I hope, a new project or two.  Happy New Year to you all!

Karen

Saturday, December 24, 2011

Merry Christmas Cookies

I have been busy baking three different kinds of cookies over the last 24 hours: 2 old stand-bys, and an experiment, that worked out pretty well.   
Chocolate Peppermint Cookies
This was the wild card.  Last year I made a similar recipe from Bon Appetit, but it was hard to find the perfect line between undercooked and overcooked, and when overcooked, they became cakey, when I was hoping for chewy.  I also thought the icing on the top was overkill.  So, I took some things I liked about the recipe- crushed candy canes, espresso powder, peppermint abstract- and merged them with another recipe, courtesy of Martha, for flourless chocolate cookies.  The first time wasn't perfect, but it was the right step toward the cookie I was seeking: chewy, a little crisp, minty.  And, they're gluten-free and dairy-free to boot.

3 cups confectioners sugar
3/4 cup Dutch-process cocoa powder (spooned and leveled)
1/2 teaspoon course salt
1 teaspoon espresso powder
4 large egg whites, room temperature (try 3?*)
1 teaspoon vanilla extract
1 teaspoon peppermint extract
6-ounces bittersweet chocolate chips
4 candy canes, crushed

In a large bowl, whisk together sugar, cocoa, salt, and espresso powder. Add egg whites, vanilla extract, and peppermint extract, and stir until incorporated.  Stir in chocolate chips.  Use a teaspoon to drop silver-dollar sized rounds onto greased, parchment-lined baking sheets.  Bake at 325 until cookie tops are cracked, about 12 minutes.  Immediately top with crushed candy canes, pressing them gently into the cookie before it hardens.  Transfer to wire racks and let cool.  Makes about 2 dozen large cookies, but if you want small to normal-sized cookies, it'll make twice as many. 
*Next year, I might try 3 egg whites instead of 4, per recipes found on King Arthur Flour and Recipe Girl to see if that makes them slightly less crispy, and more chewy.  It's a work in progress, but after so much 11th hour baking, I've decided to wait until Christmas comes around again to perfect it. 

Snowball Cookies
These are quick and easy, and I often double the recipe.

2 cups flour
3/4 teaspoon kosher salt
3/4 cup softened butter
1/2 cup sugar
2 teaspoons vanilla
1 egg
1 cup white chocolate chips
1 cup finely chopped walnuts
confectioners sugar

Mix flour and salt in a separate bowl  Cream butter, sugar, vanilla and egg.  Gradually add flour mixture.  Stir in chocolate chips and nuts.  Roll into teaspoon-sized balls (if they're too big, the middle may be doughy), and bake at 350 until the bottom is lightly brown, 13-15 minutes.  Cool and shake on confectioners sugar.  Makes over 2 dozen.

Meringue Cookies
My mom always made this cookie when we were growing up.  They are spectacular.  I used Corn Chex instead of corn flakes this time around.  I also used bittersweet chocolate chips instead of semisweet.  These also happen to be gluten-free and dairy-free cookies.  Double the recipe; you'll be sorry if you don't.

2 egg whites
1/4 teaspoon vanilla
1 cup confectioners sugar (sifted)
pinch of salt
2 cups of corn flakes, or Corn Chex
1 cup coconut
1 6-ounce package of chocolate chips 

(Sidebar: Why do recipes always call for a 6-ounce package of chocolate chips? I've never seen one.  That's 1/2 a 12-ounce package of chocolate chips to most of us.)

Beat egg whites, salt, and vanilla until soft peaks form.  Gradually add confectioners suger, beating until peaks are stiff. Fold in corn flakes, coconut, and chocolate chips.  Drop by heaping teaspoons on well-greased cookie sheets.  Bake at 300 for 20 minutes.  Let cool before removing from the pan.  Makes 2 dozen.
Wishing you all a sweet holiday!
Karen

Friday, December 23, 2011

Christmas Craft Inspiration

We went to Florida for a few days for a pre-Christmas family visit.
We ate, drank, relaxed, and enjoyed a little of this
and some of that.

Since then, I've been scrambling to get things done at work and all the Christmas crafts I wanted to do will have to wait for next year.  Still, I thought I'd share what inspired me at a favorite local store. 

You're posting pictures of craft projects you're going to do?, my husband asks.  Yes, I reply. I am.

These would be easy enough to make with some bells, wire, ribbon, and spray snow or paint.

I imagine there's a styrofoam cone under these pieces of felt.

When I picked up all of those scallop shells on the beach last summer, I should have saved some for ornaments.

Or tea lights.

Or hurricanes.

The good news is these make great gifts, but I don't have to wait for Christmas.

Centsational Girl did a great tutorial a few months ago on how to make a bread board.  She used a jig saw and made it look pretty easy.  This is going on my list of things to attempt in 2012.

I'll admit it was a little embarrassing trying to snap photos in a store without attracting too much attention. It felt like stealing and I am slightly ashamed, but I was inspired, and maybe sharing what I saw will inspire you. 

In lieu of crafts, I'm going to run a few errands and then spend the afternoon making cookies.  Tomorrow, I'll share a few of my favorite recipes, and photos of cookies I actually made, but none of the cookies, though, I wish that was possible.

Are you ready?  When do you put the hustle and bustle behind you and start to relax and enjoy?

Thursday, December 15, 2011

Bathroom Before

Welcome to our bathroom.
Notice how close the door is to the sink.  Now imagine washing your face at that sink, which is only 30 inches high.  That hits me at the top of the thigh, and I'm only 5'4". 

Did you notice the blue fixtures?  (Yes, I know that some people covet this retro look, and I will make one of them very happy when I give these away on Craigslist.)  What you can't see is that the toilet and sink are actually two slightly different shades of robin's egg blue.

The mirror has an antique finish.  

The faucet is corroded and leaks. 
The sink looks like it is falling off the wall, but that's just a cosmetic issue, so far. 

I present the shower, in all its fiberglass glory:
There's no light above, so it's pretty dark when the curtain is closed.  The one light is a combination light/fan over the sink.

The walls have no tile or paint.  There's no counter space or storage, aside from the small free-standing cabinet we've squeezed in the corner. It will be an easy bathroom to demo. 

This wall is coming down:

How long will it take to move the door frame, build the wall back up, with a closet on either side, install a new tile shower, put in a skylight and finish the floor?  (The floor plans can be found here.) We'll get a plumber to install the fixtures and an electrician put in the lights.    I'm setting my sites on 4 months, with room to open that up to 6 months.  The real question is, when do we start?

Do you have any bathroom remodeling experience?  Words of wisdom welcome. 

Monday, December 12, 2011

Sunday Soups: Red Lentil

I hope everyone had a good weekend.  It's beginning to look a lot like Christmas around here.  We're still picking parsley, scallions, leeks and arugula from the garden, but the wreaths are up,

the cactus is blooming,
and our little tree is decorated.
I'm providing holiday photos to distract from the out-of-focus pictures I took of the soup before we had it for lunch yesterday.  I must have hit a button and not realized it.  I don't know how to use the fancy borrowed camera I'm working with, and my mind was on dinner.  We had friends and family for a holiday gathering, tested out the ottoman tray, and I made my first standing rib roast.  Which cooked an hour faster than it was supposed to.  Just like the Thanksgiving turkey.  Something tells me my new oven may need calibrating.  Anyway, the handy meat thermometer told us when to take it out, so it was perfect, just early.

This is one of my go-to favorites because it's so healthy and quick to make.  The preparation has a good rhythm to it.  The chopping time is incorporated into the waiting time.  Depending on the ingredients I have on hand, I've used both this Gourmet recipe, and this one.  I prefer the latter, choosing red pepper over tomato, and cilantro over parsley.  Both recipes are great. 
Red Lentil Soup

1 pound red lentils, picked over
7 cups water
1 cup chopped onion
3 garlic cloves, minced
1 teaspoon ground coriander
1 teaspoon ground cumin
1/4 teaspoon turmeric
5 carrots (about 10 ounces), chopped
1 cup finely chopped red bell pepper
1/4 cup packed fresh cilantro, chopped
1/4 cup chopped scallion greens
cayenne to taste
salt and pepper

In a 4-quart saucepan bring lentils and water to a boil and skim froth. (Chop the onion and garlic.) Stir in onion, garlic, ground coriander, cumin, and turmeric and simmer, partially covered, 15 minutes. (Chop the carrots and pepper.) Stir in carrots and bell pepper and simmer until carrots are tender, about 10 minutes. (Chop the cilantro and scallions.) Soup may be prepared up to this point 3 days ahead, cooled, uncovered, and chilled, covered. Stir in cilantro, scallions, cayenne, and salt and pepper to taste.

And, this is the best shot I got.
Have a good week!

Friday, December 9, 2011

The Ottoman Tray

Once upon a time, I made this ottoman
out of this large end table. 
And I was left with the bottom shelf. 

Then I was searching, searching, searching for a large ottoman tray, and they were expensive.  Like CRAZY $100 to $200 expensive.  So I came back to the shelf, which was obviously the perfect size for the ottomon.  I sawed off the legs and prepared to paint.

And then I had a brilliant idea.

And then my brilliant idea failed. 

But, in the end, no one would ever know it failed.

Except that I decided to tell you about it. 

My brilliant idea was to get a nautical map and decoupage it onto the tray, providing a conversation piece beneath the appetizers and drinks we would serve to guests in our living room.

It didn't go as well as I had hoped.  It's been a while since I made my cork boards and side table, and my decoupage skills were a bit rusty.  If you've never decoupaged anything, it's easy. 

How to Decoupage
1. Mix a solution of 50% glue (the regular old white kind) and 50% water. 
2. Brush the solution over whatever you want to glue it to; the surface should be clean, and preferably primed or painted.
3. Once it dries, coat with a dozen or so coats of polyurethane, until the surface is smooth and protected.

I was worried I would have trouble getting such a large item to stick (most of my experience is with wine labels, which are much smaller than maps), so I made the mistake of NOT following the instructions above and decided to brush the surface with the glue solution first, and then lay the map down.  That proved to be difficult, but I did get the map in place.  And then it started to bubble.  I brushed the decoupage solution over the top and there was more bubbling, and as I tried to gently push out those air bubbles, wrinkling.  And as I became more and more frustrated and desperate, smudging. 

If I were to get a new map and try again, I would carefully place the map, maybe tape down the corners, and gently brush the decoupage solution from the middle out until it was in place, hopefully with fewer air bubbles, and thus no wrinkles or smudges. 
Fortunately, there's a second side to the ottoman tray, but I didn't want to risk ruining it with another failed decoupage attempt.  So, I painted the whole tray using two coats of Annie Sloane's Chalk Paint in Country Grey, the same color I used on this table.  Then I used  a rag to apply a coat of Annie Sloan's Clear Wax.  If you have a piece with lots of detail, it's better to use a stiff brush, but a rag works fine when it's mostly a flat surface.  I let it dry for 24 hours, and then buffed it with a clean cloth until it was smooth. This last step takes just a few minutes and really completes the finish.  The wax just sits there until you make it shine.  For table tops (and ottoman trays), it is recommended to do 2-3 coats of wax.  I haven't done that yet, but I will.


I love how it turned out, especially the faux bamboo detailing around the edges. And no one will know what's on the other side.  Unless you are reading this now and then someday are having drinks and appetizers in my living room and ask to see it.

If you're interested in trying Annie Sloan's Chalk Paint, there's a giveaway that you can enter through Home Stories A to Z to win $150 in Annie Sloan products, and a chance to win a grand prize of a class with the master when she tours the U.S. this Spring.  Good luck!

And, have a great weekend!

P.S. I've joined the first Before and After party of 2012 on Thrifty Decor Chick.  Check it out for lots of inspiring projects.
beforeAndAfterButton

Wednesday, December 7, 2011

Bathroom Inspiration

A few weeks ago I shared the floor plans for our upcoming bathroom remodel.  I've been thinking about this for over 4 years, so I've pretty much decided exactly what I want our new bathroom to look like. 

The shower will have 2x8 green glass tiles, like these.
Pottery Barn
The shower door will be glass, to help the room to feel more open.
Pinned Image
houzz.com

We're going to build a vanity, something like this from Restoration Hardware.
Pinned Image

I also love this rustic look, but the shelves on the one above are more practical.
Pinned Image
from Ana Spiro, via Little Green Notebook

I was planning on a carrara marble countertop,though someone has recently suggested that we consider wood, maybe something like the after here?


I am hoping to find a deal on this unfortunately pricey Cifial nickel faucet, but so far, no luck.
 Pinned Image
I like the idea of being able to control the water temperature with one handle.  I get easily frustrated.  Most single-handle faucets are very modern, but this one suits our style perfectly.

We're going to build a medicine cabinet like this one, from Restoration Hardware, too.
Shutter Medicine Cabinet from Restoration Hardware

And these nickel sconces from Pottery Barn will go on either side.
Pinned Image

On the walls, I'd like to do a board and batten treatment, something like this.
Pinned Image
4men1lady.com via Pinterest
White on the bottom, pale green on the top. 

The subway tiles are almost exactly the same color as the Benjamin Par Four we have in the guest room, so I think I'll use that same color. 


Because we'll be installing a sky light, we're going to try to bump out the ceiling a little bit, and maybe we can do some paneling or more board and batten up there.
Pinned Image
thestoriesofa2z.com via Pinterest

We're still deciding on what kind of floors to get.  I want wood, but some say it's impractical in a bathroom, which is not an unreasonable point.  Still, I can't imagine it without wood.  Tile feels so cold and hard to me. The decision is also complicated by the need to install heat somehow (Did I mention that our current bathroom has no heat?) and I'm not sure if we can put radiant heat under wood floors. 

So, can you picture how it will all come together?  Me neither.  I feel like this bathroom sort of gives an idea of the feeling I'm going for.
love the angled ceilings, our color scheme
Better Homes and Gardens
Only ours probably won't feel as big, and we'll have a shower instead of a tub, and the vanity is on top of the dresser on the right side of the room, and the window is on the ceiling.  And the floor is wood.

It will take a while for it to come together for real, and I'm sure there will be some decision changes along the way, but I can't wait for the end result.  Next week, I'll show you just how sad the current bathroom is, and maybe you'll agree that we should be commended for living with it as long as we have.